Fix minor bugs, and add network.sh script to simplify standing up the network

Note: the updated peerNadmin.sh scripts no longer create or join a channel and now only configure the environment for the relevant peer

Signed-off-by: James Taylor <jamest@uk.ibm.com>
11 KiB
Test network - Nano bash
Test network Nano bash provides a set of minimal bash scripts to run a Fabric network on your local machine. The network is functionally equivalent to the docker-based Test Network, you can therefore run all the tutorials and samples that target the Test Network with minimal changes. The Fabric release binaries are utilized rather than using docker containers to avoid all unnecessary layers. And you can choose between running the chaincode and chaincode builder in a docker container behind the scenes or running the chaincode as a service without any containers at all. Using the Fabric binaries also makes it simple for Fabric developers to iteratively and quickly modify Fabric code and test a Fabric network as a user.
As the name nano implies, the scripts provide the smallest minimal setup possible for a Fabric network while still offering a multi-node TLS-enabled network:
- Minimal set of dependencies
- Minimal requirements on Fabric version (any v2.x orderer and peer nodes should work)
- Minimal set of environment variable overrides of the default orderer orderer.yaml and peer core.yaml configurations
- Minimal scripting with minimal set of reference commands to get a Fabric network up and running
- Minimal channel configuration for an orderer organization (3 ordering nodes) and two peer organizations (with two peers each)
- Minimal endorsement policy to allow a single organization to approve and commit a chaincode (unlike Test Network which requires both organizations to endorse)
Prereqs
- Follow the Fabric documentation for the Prereqs
- Follow the Fabric documentation for downloading the Fabric samples and binaries. You can skip the docker image downloads by using
./install-fabric.sh binary samples
To run the chaincode as a service
You need to configure the peer to use the ccaas external builder downloaded with the binaries above.
The path specified in the default config file is only valid within the peer container which you won't be using.
Edit the fabric-samples/config/core.yaml file and modify the externalBuilders field to point to the correct path.
The configuration should look something like the following:
externalBuilders:
  - name: ccaas_builder
    path: /Users/nanofab/fabric-samples/builders/ccaas
    propagateEnvironment:
      - CHAINCODE_AS_A_SERVICE_BUILDER_CONFIG
If you have yq installed, run the following command in the fabric-samples directory to update the configuration:
yq -i 'del(.chaincode.externalBuilders) | .chaincode.externalBuilders[0].name = "ccaas_builder" | .chaincode.externalBuilders[0].path = env(PWD) + "/builders/ccaas" | .chaincode.externalBuilders[0].propagateEnvironment[0] = "CHAINCODE_AS_A_SERVICE_BUILDER_CONFIG"' config/core.yaml
Instructions for starting network
Running each component separately
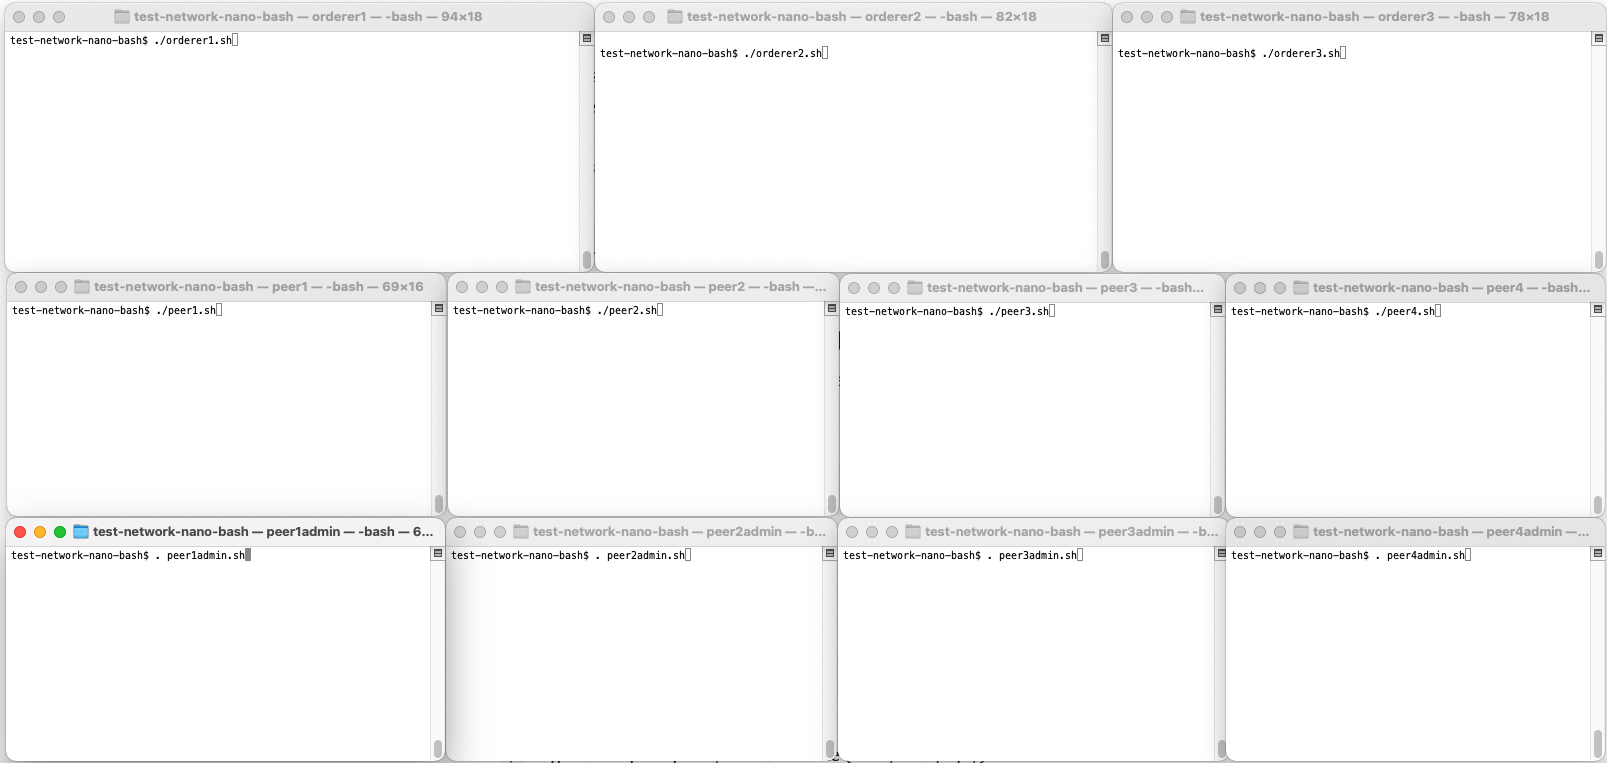
Open terminal windows for 3 ordering nodes, 4 peer nodes, and 4 peer admins as seen in the following terminal setup. The first two peers and peer admins belong to Org1, the latter two peer and peer admins belong to Org2.
Note, you can start with two ordering nodes and a single Org1 peer node and single Org1 peer admin terminal if you would like to keep things even more minimal (two ordering nodes are required to achieve consensus (2 of 3), while a single peer from Org1 can be utilized since the endorsement policy is set as any single organization).
The following instructions will have you run simple bash scripts that set environment variable overrides for a component and then runs the component. The scripts contain only simple single-line commands so that they are easy to read and understand. If you have trouble running bash scripts in your environment, you can just as easily copy and paste the individual commands from the script files instead of running the script files.
- cd to the
test-network-nano-bashdirectory in each terminal window - In the first orderer terminal, run
./generate_artifacts.shto generate crypto material (calls cryptogen) and system and application channel genesis block and configuration transactions (calls configtxgen). The artifacts will be created in thecrypto-configandchannel-artifactsdirectories. - In the three orderer terminals, run
./orderer1.sh,./orderer2.sh,./orderer3.shrespectively - In the four peer terminals, run
./peer1.sh,./peer2.sh,./peer3.sh,./peer4.shrespectively - Note that each orderer and peer write their data (including their ledgers) to their own subdirectory under the
datadirectory - In the four peer admin terminals, run
source peer1admin.sh && ./create_channel.sh,source peer2admin.sh && ./join_channel.sh,source peer3admin.sh && ./join_channel.sh,source peer4admin.sh && ./join_channel.shrespectively
Note the syntax of running the scripts. The peer admin scripts set the admin environment variables and must be run with the source command in order that the exported environment variables can be utilized by any subsequent user commands.
The create_channel.sh script creates the application channel mychannel, updates the channel configuration for the gossip anchor peer, and joins the peer to mychannel.
The join_channel.sh script joins a peer to mychannel.
Starting the network with one command
Using the individual scripts above gives you more control of the process of starting a Fabric network and demonstrates how all the required components fit together, however the same network can also be started using a single script for convenience.
./network.sh start
After the network has started, use seperate terminals to run peer commands. You will need to configure the peer environment for each new terminal. For example to run against peer1, use:
source peer1admin.sh
Instructions for deploying and running the basic asset transfer sample chaincode
To deploy and invoke the chaincode, utilize the peer1 admin terminal that you have created in the prior steps. You have two possibilities:
- Using a chaincode container
- Running the chaincode as a service
1. Using a chaincode container
Package and install the chaincode on peer1:
peer lifecycle chaincode package basic.tar.gz --path ../asset-transfer-basic/chaincode-go --lang golang --label basic_1

peer lifecycle chaincode install basic.tar.gz
The chaincode install may take a minute since the fabric-ccenv chaincode builder docker image will be downloaded if not already available on your machine. Copy the returned chaincode package ID into an environment variable for use in subsequent commands (your ID may be different):
export CHAINCODE_ID=basic_1:faaa38f2fc913c8344986a7d1617d21f6c97bc8d85ee0a489c90020cd57af4a5
2. Running the chaincode as a service
Package and install the external chaincode on peer1 with the following simple commands:
cd chaincode-external

tar cfz code.tar.gz connection.json
tar cfz external-chaincode.tgz metadata.json code.tar.gz

cd ..

peer lifecycle chaincode install chaincode-external/external-chaincode.tgz
Copy the returned chaincode package ID into an environment variable for use in subsequent commands (your ID may be different):
export CHAINCODE_ID=$(peer lifecycle chaincode calculatepackageid chaincode-external/external-chaincode.tgz) && echo $CHAINCODE_ID
In another terminal, navigate to fabric-samples/asset-transfer-basic/chaincode-typescript and build the chaincode:
npm install
npm run build
Set the chaincode package ID again (this is a different terminal):
export CHAINCODE_ID=$(peer lifecycle chaincode calculatepackageid ../../test-network-nano-bash/chaincode-external/external-chaincode.tgz) && echo $CHAINCODE_ID
Set the chaincode server address:
export CHAINCODE_SERVER_ADDRESS=127.0.0.1:9999
And start the chaincode service:
npm run start:server-nontls
Activate the chaincode
Using the peer1 admin, approve and commit the chaincode (only a single approver is required based on the lifecycle endorsement policy of any organization):
peer lifecycle chaincode approveformyorg -o 127.0.0.1:6050 --channelID mychannel --name basic --version 1 --package-id $CHAINCODE_ID --sequence 1 --tls --cafile ${PWD}/crypto-config/ordererOrganizations/example.com/orderers/orderer.example.com/tls/ca.crt

peer lifecycle chaincode commit -o 127.0.0.1:6050 --channelID mychannel --name basic --version 1 --sequence 1 --tls --cafile "${PWD}"/crypto-config/ordererOrganizations/example.com/orderers/orderer.example.com/tls/ca.crt
Note: after following the instructions above, the chaincode will only be installed on peer1 and will only be available in the peer1admin shell.
Rerun the peer lifecycle chaincode install command in other peer admin shells to install it on the corresponding peer.
You will also need to rerun the peer lifecycle chaincode approveformyorg command to use the chaincode on peers in another organisation, e.g. using the peer3admin shell.
Interact with the chaincode
Invoke the chaincode to create an asset (only a single endorser is required based on the default endorsement policy of any organization). Then query the asset, update it, and query again to see the resulting asset changes on the ledger. Note that you need to wait a bit for invoke transactions to complete.
peer chaincode invoke -o 127.0.0.1:6050 -C mychannel -n basic -c '{"Args":["CreateAsset","1","blue","35","tom","1000"]}' --tls --cafile "${PWD}"/crypto-config/ordererOrganizations/example.com/orderers/orderer.example.com/tls/ca.crt

peer chaincode query -C mychannel -n basic -c '{"Args":["ReadAsset","1"]}'

peer chaincode invoke -o 127.0.0.1:6050 -C mychannel -n basic -c '{"Args":["UpdateAsset","1","blue","35","jerry","1000"]}' --tls --cafile "${PWD}"/crypto-config/ordererOrganizations/example.com/orderers/orderer.example.com/tls/ca.crt

peer chaincode query -C mychannel -n basic -c '{"Args":["ReadAsset","1"]}'
Congratulations, you have deployed a minimal Fabric network! Inspect the scripts if you would like to see the minimal set of commands that were required to deploy the network.
Stopping the network
If you started the Fabric componentes individually, utilize Ctrl-C in the orderer and peer terminal windows to kill the orderer and peer processes. You can run the scripts again to restart the components with their existing data, or run ./generate_artifacts again to clean up the existing artifacts and data if you would like to restart with a clean environment.
If you used the network.sh script, utilize Ctrl-C to kill the orderer and peer processes. You can restart the network with the existing data, or run ./network.sh clean to remove old data before restarting.